本系列有五篇:分别是
:主要是安装方面 :主要是jekyll的配置目录
- 什么是jekyll
- 快速开始
- 目录结构
- 配置
- 默认配置
- Front Matter
- 写文章
- 发文章的文件夹
- 创建文件
- 内容的样式
- 包含图片和资源
- 显示一系列的文章
- 显示文章的第一个段
- 高亮代码片段
- 高亮代码同时显示行号
- _drafts文件夹工作方式
- 创建页面
- 主页
- 变量
- 全局变量
- site变量
- page变量
- Paginator变量
- 通过Liquid模板系统可以自定义数据
- 添加评论
什么是jekyll??
简单说:它是静态网页生成器。 具体点:包含一些用markdown语法写的文件的文件夹;通过markdown和Liquid转换器 生成一个网站。 同时jekyll也是github静态页面引擎。意味着你可以用jekyll生成你的页面,免费托管在github服务器。快速开始
假设已经已经安装完Jekyll【安装方法 】
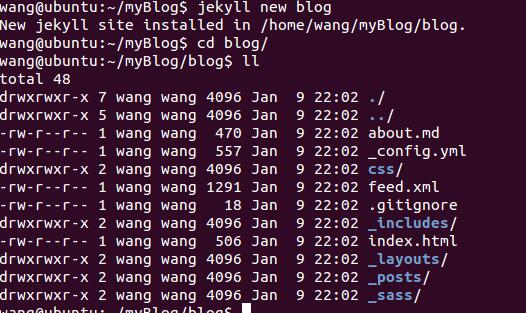
tip::生成博客目录到本地: jekyll new .
启动服务器:
jekyl serve
然后浏览器访问:localhost:4000即可(预览)
基本用法:
通过gem安装包管理器安装好jekyll以后,就能够在windows的命令行中执行jekyll jekyll build{到项目根目录,执行编译后,当前目录自动生成_site文件夹} tip::编译到指定地方 jekyll build --destination <destination> 编译指定文件夹 jekyll build --source <source> --destination <destination> 编译后好自动监听文件变化 自动编译 jekyll build --watch 提示: 编译到的目标文件夹会被清空 预览: jekyll serve 访问: localhost:4000 tip::2.4版本以后会自动检测文件的改变 禁止该行为: jekyll serve --no-watch 除了--no-watch等配置项,还有其他很多配置 一般是放在根目录下面的_config.xml文件下面,前面的放在命令行也是一种方式 调用jekyll命令的时候会自动用_config.xml里面的配置。 比如:_config.xml里的 source:_source destination:_deploy 相当于: jekyll build --source _source --destination _deploy
目录结构


_config.yml :存储配置数据。把配置写在这个文件里面,可以让你不用在命令行中写。
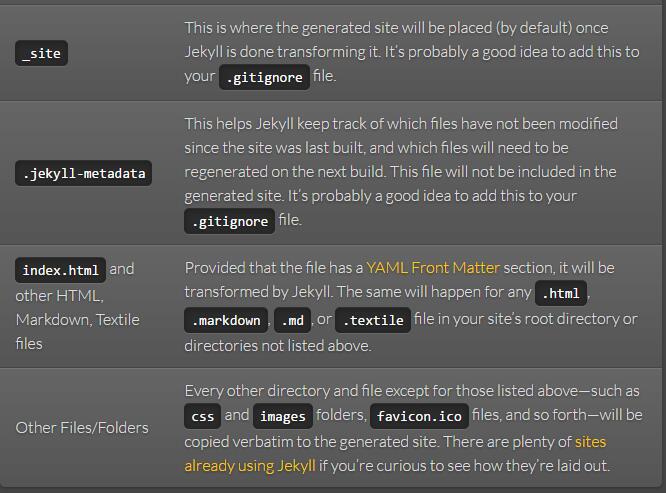
_drafts:草稿,格式是:没有日期.md _includes:包含一些模板,可以重复利用。你可以用通过{% include file.ext %}包含_includes/file.ext文件{这种方式是liquid语法} _layouts:里面的文件通过{ { content }}包含_posts里面的文章。 _posts:存放你要发表的文章。格式YEAR-MONTH-DAY-title.MARKUP。 文件名确定了发表的日期和标记语言。博客的日期格式通过_config.yml的permalink字段设置或者通过YAML FRONT Matter设置 _data:保存数据的。jekyll会自动加载这里的所有 .jml或者.yaml结尾的文件。 比如你有一个members.yml。那么你可以通过site.data.members 访问该文件里的数据。 _site: jekyll生成的网站会放在该文件夹下。 最好把它放到.gitignore文件里面,这样git就不会管理它了。 index.html: 该文件里面有一个YAML FRONT Matter。大概就长下面这样: --- layout: index title: FEX page_id: index --- jekyll会转换它。包括所有的根目录下面的,或者不是以上提到的,目录。 里的.html,.markdown,.md,和.textile文件。 除了上面提到的其他文件或者文件夹,会被自动拷贝 到_site文件夹里面。包括 css和图片文件夹,favicon.icon文件。
配置
defaults key in the _config.yml file in your projects root directory. my-site layout. Any html files that exist in the projects/ folder will use the project layout, if it exists. Those files will also have the page.author set to Mr. Hyde as well as have the category for the page set to project. 默认配置
# Where things aresource: .destination: ./_siteplugins_dir: ./_pluginslayouts_dir: ./_layoutsdata_dir: ./_dataincludes_dir: ./_includescollections: null# Handling Readingsafe: falseinclude: [".htaccess"]exclude: []keep_files: [".git", ".svn"]encoding: "utf-8"markdown_ext: "markdown,mkdown,mkdn,mkd,md"# Filtering Contentshow_drafts: nulllimit_posts: 0future: falseunpublished: false# Pluginswhitelist: []gems: []# Conversionmarkdown: kramdownhighlighter: rougelsi: falseexcerpt_separator: "\n\n"incremental: false# Servingdetach: falseport: 4000host: 127.0.0.1baseurl: "" # does not include hostname# Outputtingpermalink: datepaginate_path: /page:numtimezone: nullquiet: falsedefaults: []# Markdown Processorsrdiscount: extensions: []redcarpet: extensions: []kramdown: auto_ids: true footnote_nr: 1 entity_output: as_char toc_levels: 1..6 smart_quotes: lsquo,rsquo,ldquo,rdquo enable_coderay: false coderay: coderay_wrap: div coderay_line_numbers: inline coderay_line_number_start: 1 coderay_tab_width: 4 coderay_bold_every: 10 coderay_css: style
{<div></div> { page.title }} ...
写文章
发文章的文件夹:
创建post文件:
Markdown 和 Textile 都是如今轻量级标记文本风潮下的产物,基本设计思路差异不大,所以我不打算纠技术细节。有兴趣者请参考我文后的链接。以下我只说一些个人的感受。
先声明,这两者都不是我的首选工具,只是之前选择时比较过。所以结果可能不完善。如有不同意见请与我联系,要求删贴也无妨。 === Markdown 的优点 === Markdown 的主要优点是有大量的第三方编辑器支持。首先 的在线文档编辑器就能很好地支持它,而 Mac App Store 或 Windows Marketplace 上搜索 Markdown editor 也是一抓一大把。很多编辑器都支持所见即所得编辑,非常方便。相比之下支持 Textile 的编辑器数量就很少。但 Markdown 在做复杂的内容编辑时能力有限,要求编写者最好具备一定的 HTML 基础,比如插入表格。对不熟悉 HTML 的朋友来说,这种操作未免麻烦了些。 ——但需要注意的是,这不算是 Markdown 的问题,而是设计者有意为之的。本来 Markdown 的设计目的是为了「简化」而非「替代」HTML。 === Textile 的优点 === Textile 的优势是不需要过多的 HTML 基础(当然如果确实需要,用户也可以用)。比如表格,它提供了 [Table] 标志而不是要求直接上 HTML 段落;又比如 == 号可用来阻止解释器解释,而不是像 Markdown 那样需要直接用 <div>。Textile 的另一个好处是它提供了一些复杂字符的内建支持,比如:(r) == ®, (tm) == ™, (c) == ©,放在 Markdown 里就麻烦一些。第三个好处,也是我很喜欢 Textile 的一点:它提供的标记更容易阅读。比如标题标记,Textile 用 .h1 .h2,级别一目了然,和 Markdown 用「#」和「##」的标识相比,可读性更好。 === 一些共同的特性 === 如果把讨论限制在方便性上,Textile 和 Markdown 只能说各有千秋。比如在处理逐条记录(itemization)时 Textile 统一用「#」,而不像 Markdown 那样要求使用 1,2,3,4。应该说 Textile 的设计便于用户变更条目顺序时避免多处修改;反过来,Markdown 处理脚注时可以使用无记名脚注,而 Textile 则必须使用 [1] 和 fn1 的组合。如果脚注顺序需要修正则会麻烦许多。 ---- 得 指点:Markdown 的逐条记录可以在编译时自动将 11223调整为12345,所以不要误会,Markdown 事实上可以相对方便地处理逐条记录。特此感谢。不过如果为了照顾纯文本的可读性,写作者最好还是得在正文里调整数字的顺序。这一点上看,Textile 还是方便。 如果把讨论限制在功能上,我只能说两者都不怎么样。这两者都适合相对非正式的文本,比如 blog 或网页。两者相对单一的 HTML 输出也证明了这一点。如果需要更复杂的功能,恐怕用户还得考虑更复杂的选项,比如我用得最顺手的 reStructuredText。 综合考虑,我倾向于认为 Textile 更适合我这种 HTML 基础较差的用户;而 Markdown 在前端程序员手里适应性更好。另外,对「所见即所得」有要求的朋友可能会在编辑器支持的问题上有所倾向。但既然这些都是纯文本编辑,多数情况下我不认为这一点非常重要,毕竟对我来说,一个 vim 足以解决所有问题。 参考: Markdown: Textile:
内容的样式:
包含图片和资源
assets or downloads, into which any images, downloads or other resources are placed. Then, from within any post, they can be linked to using the site’s root as the path for the asset to include. Again, this will depend on the way your site’s (sub)domain and path are configured, but here some examples (in Markdown) of how you could do this using the site.url variable in a post. 
就会显示以下图片:

更具体可以参考:【】
显示一系列的文章:
显示文章的第一个段
高亮代码片段
高亮代码同时显示行号:
_drafts文件夹工作方式
创建页面
主页
变量
全局变量
site变量
page变量
Paginator变量
Paginator variable availability:These are only available in index files, however they can be located in a subdirectory, such as /blog/index.html.
In addition to the available from Jekyll, you can specify your own custom data that can be accessed via the .
通过Liquid模板系统可以自定义数据
Plugins(插件)
Jekyll has a plugin system with hooks that allow you to create custom generated content specific to your site. You can run custom code for your site without having to modify the Jekyll source itself.
Plugins on GitHub Pages
is powered by Jekyll. However, all Pages sites are generated using the --safeoption to disable custom plugins for security reasons. Unfortunately, this means your plugins won’t work if you’re deploying to GitHub Pages.
Installing a plugin(安装插件)
You have 3 options for installing plugins:(有三种方法)
- In your site source root, make a
_pluginsdirectory. Place your plugins here. Any file ending in*.rbinside this directory will be loaded before Jekyll generates your site. -
In your
_config.ymlfile, add a new array with the keygemsand the values of the gem names of the plugins you’d like to use. An example:gems: [jekyll-coffeescript, jekyll-watch, jekyll-assets] # This will require each of these gems automatically.
Then install your plugins using
gem install jekyll-coffeescript jekyll-watch jekyll-assets -
Add the relevant plugins to a Bundler group in your
Gemfile. An example:group :jekyll_plugins do gem "my-jekyll-plugin" gem "another-jekyll-plugin" end
Now you need to install all plugins from your Bundler group by running single command
bundle install
tip::
_plugins, _config.yml and Gemfile can be used simultaneously
You may use any of the aforementioned plugin options simultaneously in the same site if you so choose. Use of one does not restrict the use of the others.
插件列表可查看
【附】使用MathJax显示公式
- 修改html头部
在需要使用的页面开头加上这么一句,在Jekyll下可以通过修改default.html加上。
2. 然后直接调用 公式和Latex公式一致的,没有太多难点,可以参考
添加评论
1、注册 账号,创建站点,得到short_name (如图,ww1111就是我的shortname)
2、创建后,就会生成的多说代码,如下:
可以详细看下代码,其中short_name就是ww1111,
参数介绍:
data-thread-key string 推荐文章在原站点中的id或其他唯一标识。通用代码中,将您站点中的文章id告知我们,是区分文章,解决分页问题的好方法,评论回流时,也以此来定位原站点文章,同id的文章,显示的是相同的评论内容。data-thread-key中:和,即冒号和逗号有特别的用途,请不要使用url或其他有这两个符号的内容作为data-thread-key。同时也请尽量避免将data-thread-key设作0、空字符串或中文。示例:在typecho建站系统中,data-thread-key=" cid;?>",phpcms中data-thread-key="{id_encode("content_$catid",$id,$siteid)}",如果您在独立静态页中使用,可以自己设置合适的值,例如首页使用data-thread-key="index",我们在管理后台的“工具”选项卡里提供了更多建站类型的示例。data-title string 推荐您的文章标题。对于通用代码,没有提前同步文章数据。如果您在后台管理看到的文章标题不正确,加入这个参数,让您在后台管理时更加便利data-image string 推荐文章图片地址,将用于转发时的附图。data-url string文章的url。第一次显示评论框时,我们会按这个参数标记文章。如果您改变了域名,或者希望几篇文章显示同一评论框,传递data-url即可解决例如之前一篇文章是链接地址是"http://abc.com/101.html" ,上面已经有100个评论,之后这篇文章有了分页,在这分页里加上data-url="http://abc.com/101.html" ,两个页面就都会显示相同的评论内容了。注意:在没有设置data-url项目时,我们优先采用页面中canonical标签值,如果没有设置canonical标签,则会使用页面的url。页面url会自动过滤#之后的参数。对于设置了不同的data-thread-key之后,还发现多篇文章出现相同评论的情况,请确认一下页面中的canonical标签是否重复。关于canonical标签,可以参考以下介绍:http://www.chinaz.com/web/2011/0630/192530.shtmldata-author-key string 推荐作者在本站中的id。对于wordpress插件,文章如果填写该id,可以识别作者,在收到评论时,会对该作者发出邮件提醒。通用代码用户及其他插件,如果需要通过这种方式获取邮件,请通过 http://dev.duoshuo.com/docs/51435552047fe92f490225de 这个接口导入用户并且要有邮箱信息,指定的user_key就是此处要填的data-author-keydata-form-position string该页面中评论框的位置,取值top(评论框在顶端显示),bottom(评论框在底端显示)data-limit int单页显示评论数,取值范围:1~200data-order string//排序方式,取值:asc(从旧到新),desc(从新到旧)这些参数,将覆盖站点的设定值,并且只对含该参数页面有效。当然,您在动态生成的页面中插入带参数的代码,则都是动态评论框了。 将代码复制,找到仓库的_layouts文件夹下的post.html文档,使用编辑器打开,将多说代码粘贴到 </div> 的后面;
然后将data-thread-key的内容 替换成 “{ {data-thread-key}}”,如下:然后可以在不同post中隔离各自的评论(即一个data-thread-key来表示不同文章的评论子集)
3、渲染结果:
还可以通过多说的面查看记录
到此已经完成了。不过。。我们希望把多说做成一个模块,这样各个文件可以通过include导入,所以我们在做些工作:
1、在_includes 文件下新增文件夹comment,在comment下新增文件duoshuo.html
$ cd _includes; mkdir comment; cd comment; touch duoshuo.html
编辑文件duoshuo.html
将多说的代码复制到里面,并修改两个红框中的内容:
这些字段的具体值由我们在不同的post中动态给定。
第一个红框的变量是在具体的post.md文件中给定的,如下图:
第二个红框变量是在_config.yml中给定的,如下图:
2、如果我希望模板post.html中增加评论功能,我们就修改post.html,编辑文件,在文章增加一行,将duoshuo.html导入进来:
{% include comment/duoshuo.html %}
3、具体的使用
如果在某个md文件中要使用评论功能,我们就选用post.html这个模块,就可以了,然后在配置(_config.yml)中修改变量就可以了,非常方便。。可以发现将md文件转换后的html文件中,变量都被填充了。。。